Caramel Pecan Rolls
Dough:
1 c. warm water
2 Tbs. yeast
1/4 c. sugar
1/3 c. oil
1 tsp. salt
1 large egg
3 1/3 c. flour
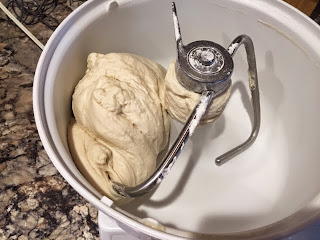
Add water to a mixer and sprinkle yeast over top. Sprinkle sugar over top of the yeast and mix it slightly to get everything wet. Add in the oil, salt, egg, half of the flour. Mix until smooth. Slowly mix in the rest of the flour, letting the flour incorporate between each small addition. You may not need all of the flour, and yet you may need a little more. You want a soft dough that is not sticky to the touch. I always know there is enough flour when the dough cleans the sides of the bowl itself as it mixes. Refer to the pictures below to see what I'm talking about. Let the dough knead for at least 5 minutes. In the meantime, prepare the pan by making the caramel sauce:
Caramel Sauce:
1 cup packed brown sugar
1/2 c. butter
1/4 c. dark corn syrup (light will work if that's all you have)
3/4 c. pecan halves.
Bring the sugar and butter to a boil. Remove from heat and add the corn syrup. Pour into the bottom of an ungreased rectangular pan (13"x9" or slightly bigger) that has tall sides (not a cookie sheet). Sprinkle with pecan halves.
When your dough is done kneading, grease a counter-top with either a little shortening or oil (using flour will make the dough too dry). Roll the dough out into a rectangle. Then add the filling.
Roll Filling:
2 Tbs. soft butter
1/2 c. chopped pecans
2 Tbs. sugar
2 Tbs. Packed brown sugar
1 tsp. cinnamon
Spread the butter overtop of the rolled out dough. Mix the pecans, sugars, and cinnamon together and sprinkle over top of the dough. Roll up tightly starting with the long end. Pinch the seam together. Cut into 12 equal slices. Place in the bottom of your prepared pan on top of the caramel. Let rise until double in size.
Bake at 350 degrees for about 30-35 minutes. Cover with tin foil towards the end if the rolls are getting too dark on top. Remove from oven and immediately invert onto a heatproof tray. I use a cookie sheet. Let stand 1 minute to allow the caramel to drizzle down. Enjoy!
This is what the dough should look like as you first start to mix in the flour.
In this picture you can see a little more flour is needed since the dough is still sticking to the sides of the bowl.
Here you can see the dough is perfect. It is not over-floured, yet it is no longer sticking to the sides of the bowl either. It has essentially cleaned the bowl as it has mixed. By the way, I didn't back when I took these pictures but I now have a little plastic gadget called a dough hook extender that I use with the dough hook. It is fabulous because it cleans the center of the bowl as it mixes so you don't get the build up of dough around the centerpiece. It works amazingly! If you have a Bosch, I highly recommend it.


No comments:
Post a Comment